Homemade Vegan Gluten-Free Hamburger Buns
Content
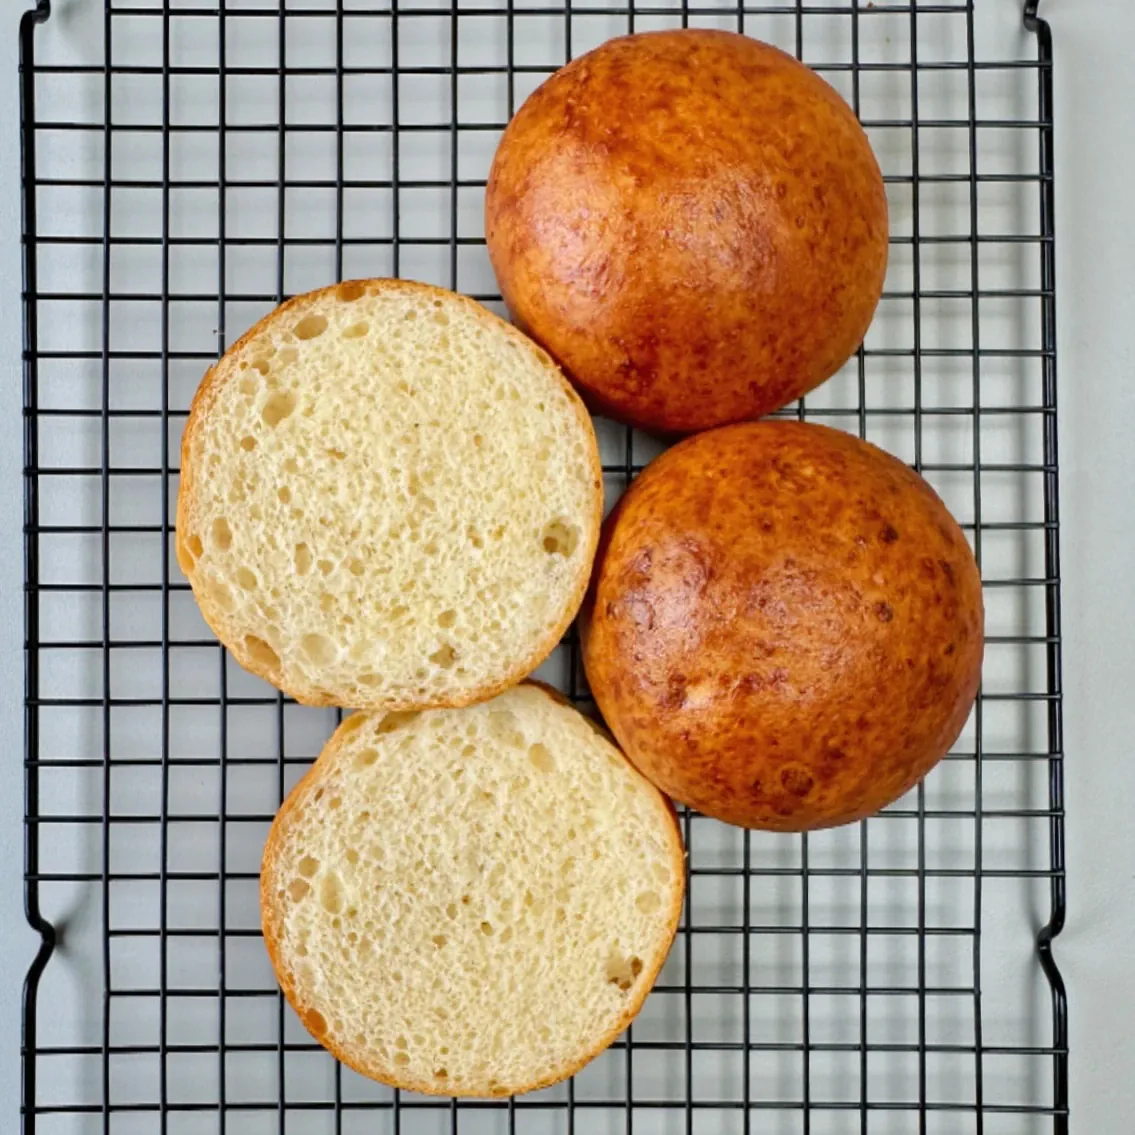
These homemade vegan gluten-free hamburger buns are soft, lightly sweet, pleasantly springy, and sturdy enough to hold a generously filled burger without immediately falling apart. The combination of brown rice flour, almond flour, potato starch, and psyllium husk powder gives the buns a much lighter crumb than many dense gluten-free breads, while yeast provides the familiar aroma and subtle fermented flavour expected from a classic burger bun. They work equally well with plant-based burgers, grilled vegetables, pulled-style fillings, or any sandwich that needs a substantial but tender roll.
The most important ingredient for the structure is psyllium husk powder. Gluten normally gives wheat dough its elasticity and helps it trap the gases produced by yeast, but this dough has no gluten to perform that job. Psyllium absorbs moisture and forms a flexible gel that helps the dough hold together as it rises and bakes. Potato starch contributes softness and lightness, while almond flour adds richness and prevents the crumb from tasting dry or chalky.
I have found when working with gluten-free yeast doughs that trying to make them resemble conventional bread dough is one of the easiest ways to spoil the texture. This mixture should remain noticeably sticky. Adding extra flour simply because the dough clings to your hands can produce heavy buns. Wet hands are much more useful for shaping, and I prefer to judge the dough by how smoothly it holds its rounded shape rather than by whether it feels dry.
Allow the buns to rise in a comfortably warm place and watch their appearance rather than relying entirely on the clock. They should become visibly fuller and lighter before baking. Once baked, give them enough time to cool before cutting. The crumb continues to set as the buns cool, and slicing them too early can make an otherwise successful gluten-free bun seem damp or fragile. Once completely cooled, they slice cleanly and are excellent lightly toasted before serving.
The most important ingredient for the structure is psyllium husk powder. Gluten normally gives wheat dough its elasticity and helps it trap the gases produced by yeast, but this dough has no gluten to perform that job. Psyllium absorbs moisture and forms a flexible gel that helps the dough hold together as it rises and bakes. Potato starch contributes softness and lightness, while almond flour adds richness and prevents the crumb from tasting dry or chalky.
I have found when working with gluten-free yeast doughs that trying to make them resemble conventional bread dough is one of the easiest ways to spoil the texture. This mixture should remain noticeably sticky. Adding extra flour simply because the dough clings to your hands can produce heavy buns. Wet hands are much more useful for shaping, and I prefer to judge the dough by how smoothly it holds its rounded shape rather than by whether it feels dry.
Allow the buns to rise in a comfortably warm place and watch their appearance rather than relying entirely on the clock. They should become visibly fuller and lighter before baking. Once baked, give them enough time to cool before cutting. The crumb continues to set as the buns cool, and slicing them too early can make an otherwise successful gluten-free bun seem damp or fragile. Once completely cooled, they slice cleanly and are excellent lightly toasted before serving.
Ingredients
- Plain unsweetened dairy-free milk: 360 ml / 1 1/2 US cups.
- Cane sugar: 38 g / 3 tablespoons.
- Active dry yeast: 7 g / 2 1/4 teaspoons.
- Psyllium husk powder: 9 g / 1 tablespoon.
- Brown rice flour: 240 g / 8.5 oz.
- Almond flour: 64 g / 2.3 oz.
- Potato starch: 80 g / 2.8 oz.
- Fine sea salt: 5 g / 1 teaspoon.
- Vegan butter, melted: 85 g / 3 oz / 6 tablespoons.
- Apple cider vinegar: 10 ml / 2 teaspoons.
- Sesame seeds: As needed for topping, optional.
8 buns:
- 1. Prepare the baking tray: Line a large baking tray with baking parchment so the sticky gluten-free dough can be shaped directly on a non-stick surface without requiring additional flour.
- 2. Warm the dairy-free milk: Heat the dairy-free milk gently until it reaches approximately 43°C / 110°F. It should feel distinctly warm but not hot. Excessive heat can damage the yeast, while cold milk will make the rising process considerably slower.
- 3. Activate the yeast: Pour the warm milk into a large measuring jug or mixing bowl and whisk in the cane sugar and active dry yeast. Leave the mixture undisturbed for 10–20 minutes. A healthy yeast mixture should develop a noticeable layer of bubbles or foam across the surface.
- 4. Check the yeast before continuing: If there is almost no activity after 20 minutes, avoid proceeding immediately. Check that the yeast is fresh and that the milk was not overheated. Starting again with active yeast is far better than baking buns that have no ability to rise.
- 5. Create the psyllium gel: Whisk the psyllium husk powder thoroughly into the activated yeast mixture. Leave it for approximately 10 minutes. The liquid should become thicker and slightly gel-like as the psyllium absorbs moisture. This transformation is essential because the gel provides much of the structure normally supplied by gluten.
- 6. Combine the dry ingredients: Add the brown rice flour, almond flour, potato starch, and sea salt to a separate mixing bowl. Whisk thoroughly until evenly distributed. Breaking up any small lumps now makes it easier to obtain a uniform dough later.
- 7. Mix the dough: Add the thickened yeast and psyllium mixture to the dry ingredients, followed by the melted vegan butter and apple cider vinegar. Stir firmly for about 3 minutes, scraping the bottom and sides of the bowl repeatedly. The finished dough should be thoroughly combined with no pockets of dry flour remaining.
- 8. Accept the sticky texture: Do not add extra flour simply because the dough feels sticky. Gluten-free hamburger bun dough is much softer and tackier than conventional wheat bread dough. Adding unnecessary flour at this stage can make the finished buns dense and dry.
- 9. Divide the dough: Transfer the dough onto a clean work surface and divide it into 8 portions of approximately equal size. Keeping the portions similar helps all of the buns bake at the same rate.
- 10. Shape the buns: Moisten your hands with water and gently shape each portion into a smooth ball. Place the shaped buns on the prepared baking tray with enough room between them to expand. Re-wet your hands whenever the dough begins sticking rather than dusting the buns with additional flour.
- 11. Add the topping: Sprinkle the tops with sesame seeds if using them. Press them very lightly into the surface so they remain attached as the buns rise and bake.
- 12. Let the buns rise: Cover the tray loosely with a clean kitchen towel and leave the buns in a warm, draught-free place for about 30 minutes. They should become visibly larger and lighter in appearance. Gluten-free dough does not always rise exactly like wheat dough, so look for clear expansion rather than expecting an identical bread-making process.
- 13. Preheat the oven: While the buns are completing their rise, preheat the oven to 176°C / 350°F. Allow the oven to reach the full temperature before baking because steady heat helps the buns set before their structure has time to collapse.
- 14. Bake until lightly golden: Place the tray in the preheated oven and bake for 25–28 minutes. The buns should be lightly golden across the surface and feel set rather than soft and wet when gently touched. Avoid deliberately over-browning them, as excessive baking can dry the gluten-free crumb.
- 15. Begin cooling carefully: Remove the tray from the oven and leave the buns undisturbed for about 5 minutes. Freshly baked gluten-free bread is relatively delicate, so this short rest allows the structure to stabilise before the buns are moved.
- 16. Cool completely: Transfer the buns carefully to a wire cooling rack and allow them to cool completely. Although they may be eaten slightly warm, the crumb develops its best texture once the interior has had time to finish setting.
- 17. Slice and serve: Cut each cooled bun horizontally with a sharp serrated bread knife. Serve as they are or lightly toast the cut sides before adding burgers and fillings. Toasting gives the surface extra strength and is particularly useful when serving juicy sauces or moist burger toppings.
Recipe Directions
FAQ
Frequently Asked Questions
▶ Why are my gluten-free hamburger buns dense rather than light and soft?
Dense buns are often caused by inactive yeast, insufficient rising time, or adding extra flour because the dough seems unusually sticky. This dough is supposed to remain tacky. Make sure the yeast becomes visibly foamy before mixing the dough, allow the shaped buns to become noticeably fuller before baking, and use wet hands for shaping instead of adding more flour.
▶ Why is psyllium husk powder important in this recipe?
Psyllium absorbs liquid and develops a flexible gel that helps bind the gluten-free flours together. It provides some of the elasticity and structural support that gluten would normally supply in wheat bread. Psyllium husk powder absorbs moisture differently from whole psyllium husks, so using the powder gives the most predictable result in this particular dough.
▶ Can I replace the almond flour with more brown rice flour?
I would not recommend making a direct one-for-one replacement. Almond flour contributes fat, moisture, and tenderness, while brown rice flour behaves quite differently. Adding extra rice flour can make the buns considerably drier and more crumbly. A tested gluten-free substitution is preferable when almond flour must be avoided.
▶ Why did my yeast mixture fail to become foamy?
The yeast may be old, the room may be particularly cold, or the milk may have been too hot. Aim for approximately 43°C / 110°F when warming the dairy-free milk. If the mixture shows virtually no activity after about 20 minutes, starting again with fresh yeast is safer than continuing with a dough that may not rise properly.
▶ How should I store the hamburger buns?
These buns have their best texture on the day they are baked. Once completely cool, place leftovers in an airtight container and refrigerate them for up to 2 days. For longer storage, slice the buns first and freeze them in a well-sealed freezer bag for up to 1 month.
▶ What is the best way to reheat frozen gluten-free buns?
Frozen buns are especially good when reheated by toasting. You can very lightly moisten the frozen bun before warming it, which helps restore some softness to the crumb. Alternatively, warm it briefly in an oven at about 175°C / 350°F until heated through, then toast the cut surfaces if you want a slightly crisp finish.
global.recipe.nutrition
Nutrition information per 1 hamburger bun
*Values are approximate. Nutritional values may vary depending on the dairy-free milk, vegan butter, ingredient brands, exact quantities, and preparation method.
300
Calories (kcal)
5 g
Protein
14 g
Fat
41 g
Carbohydrates
6 g
Sugars
0.9 g
Salt

Markas Kriaučiūnas
Recipe Author
I am a food technologist, and to me, food is an adventure. I enjoy unique ingredient combinations, seasonal dishes, and desserts. I almost never cook the same dish twice, but I always choose healthy and delicious food.
I graduated from the Liutauras Čeprackas Culinary Academy and also attended the culinary studio of Gian Luca Demarco (an Italian chef). Additionally, I worked at the River Town restaurant in Vilnius for 5 years. Now, I try to share all of this experience with my readers on worldrecipes.eu