Air fryer cornflake chicken fingers for crispy, healthy family meals
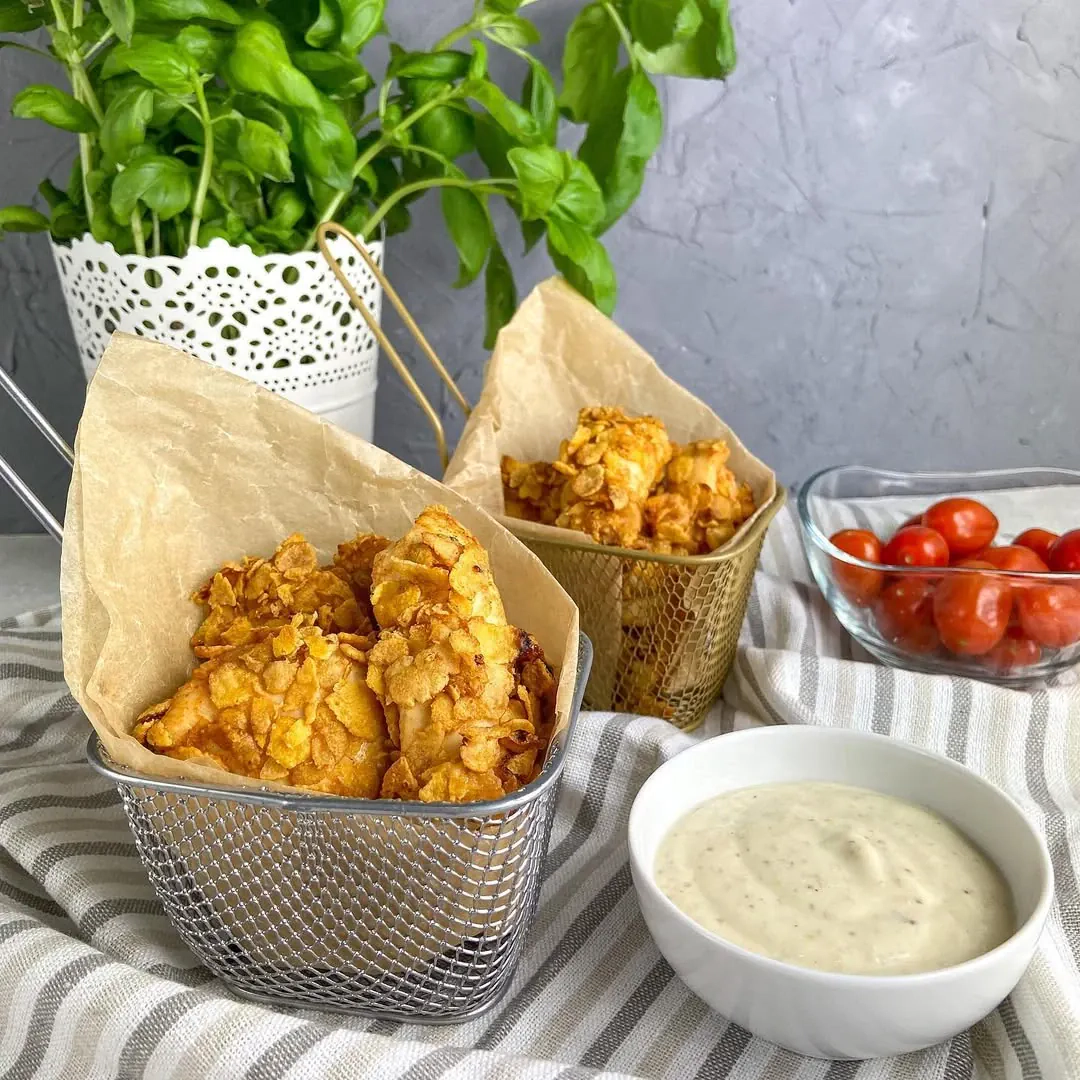
Air Fryer Cornflake Chicken Fingers are a delicious twist on classic chicken tenders, delivering that irresistible crunch without deep frying in oil. These crispy chicken strips are coated in crushed cornflakes, spiced to perfection, and baked in an air fryer for a lighter yet wonderfully satisfying result. This recipe has been handed down in my family; I adapted it over years of testing to balance crispiness, flavor, and juiciness. I discovered that cornflake coating gives a more even crunch than breadcrumbs and holds up well during air frying. Friends and kids alike have raved about how these taste like “real fried chicken” but feel much healthier.
Because I had tested multiple variations — adjusting coating thickness, seasoning blends, and cooking temperatures — this recipe represents the sweet spot between ease, texture, and flavor. I used both cornflakes and optional breading alternatives to ensure you can adapt with what you have.
Advertisement
Possible ingredient alternatives
- Cornflake cereal: crushed cornflakes, or substitute with panko breadcrumbs or crushed Ritz crackers for differing textures.
- Chicken breast: skinless, boneless chicken thighs or chicken tenderloins may be used; thighs offer more moisture.
- Milk: you can use whole milk, low-fat milk, or unsweetened plant-based milk (such as almond or soy); buttermilk works especially well to tenderize.
- Egg: substitute with egg whites or a flax egg (1 tablespoon ground flaxseed + 3 tablespoons water) for lighter or vegan-friendly options.
- Seasonings: if you lack paprika, smoked paprika or chili powder may replace; use garlic powder if garlic salt isn’t available.
- Cooking fat spray: use olive oil spray or avocado oil spray; or lightly brush chicken fingers with melted butter or oil if you don’t have a spray.
Cooking tips for the best
- Always preheat your air fryer for about 3 minutes; that helps to achieve crisp exterior right away.
- Crush cornflakes finely but leave some small chunks for texture; overly fine powder leads to less crunch.
- Pat chicken pieces dry before coating; moisture prevents crispness and can cause coating to fall off.
- Use a wire rack or rack insert inside the air fryer if your model supports it; allows air circulation beneath for more even browning.
- Do not overcrowd the air fryer basket; leave at least ½-inch space between fingers so hot air circulates.
- Flip or turn the chicken halfway through cooking to ensure both sides are crisp and golden.
- Let the chicken rest for a few minutes after cooking; carryover heat finishes cooking and juices redistribute.
Ingredients
- Chicken breast: 1½ pounds (≈ 680 g), skinless and boneless, cut into strips.
- Cornflake cereal: 3 cups (≈ 90 g), crushed (see alternatives above).
- All-purpose flour: ½ cup (≈ 65 g).
- Eggs: 2 large eggs, beaten.
- Milk (or buttermilk / plant-based milk): ¼ cup (≈ 60 ml).
- Paprika: 1 teaspoon.
- Garlic powder: ½ teaspoon.
- Onion powder: ½ teaspoon.
- Salt: 1 teaspoon (or to taste).
- Black pepper: ½ teaspoon, freshly ground.
- Cooking spray or oil: as needed to lightly coat or spray.
- 1. Begin by preheating the air fryer to 400 °F (≈ 200 °C). Meanwhile, prepared chicken strips were patted dry using paper towels and set aside.
- 2. In one shallow bowl, mixed the beaten eggs and milk together; seasoning was added here (a pinch of salt, black pepper) and whisked until fully combined.
- 3. In a separate bowl, combined flour, paprika, garlic powder, onion powder, plus remaining salt and pepper; this dry mix lay ready for dredging.
- 4. A third bowl held the crushed cornflakes; I ensured that the flakes were crushed to medium-coarse texture so coating would stick and crunch properly.
- 5. Each chicken strip was first dredged in the seasoned flour, shaking off excess; then dipped into the egg-milk mixture; finally pressed firmly into the cornflake crumbs to fully coat both sides.
- 6. The coated chicken fingers were placed onto a baking sheet or plate, allowing them to rest for 5 minutes so the coating adhered better.
- 7. Once air fryer had reached temperature, sprayed its basket lightly with oil spray. Chicken fingers then were arranged in a single layer, spaced apart so hot air could circulate.
- 8. Cooked for 6 minutes; after this the pieces were flipped over and sprayed lightly on the second side; then cooked for an additional 5-6 minutes, making total cooking time about 12 minutes, until interior reached 165 °F (74 °C) and coating was golden-brown and crisp.
- 9. Removed fingers from air fryer and let rest on a wire rack for 2-3 minutes before serving; this resting time preserved texture and locked in juices.
- 10. Chef’s advice:Because I have both family heritage and restaurant experience informing this recipe, here are a few more refined touches: always use fresh spices rather than old ones — paprika loses flavor over time. If your cornflakes are slightly sweetened, reduce sugar-based seasonings elsewhere to avoid unwanted sweetness. And if your air fryer tends to run hot, consider lowering temperature by 10 °C (≈ 25 °F) and increasing cooking time slightly to avoid burning the coating.
Recipe Directions
FAQ
How do I get the coating to adhere firmly and stay crunchy in the air fryer?
Pat the chicken completely dry, then follow a three-stage breading (dry → wet → cereal) and let the coated strips rest for 5–10 minutes before air-frying. I do this every time after testing multiple batches; the rest hydrates the flour layer so the outer crumbs bond instead of flaking off. Preheating the air fryer and lightly oil-spraying the exterior also promote rapid surface dehydration and Maillard browning, which is why the crust sets crisp rather than steaming soft.
What time and temperature give juicy chicken without undercooking?
Cook at 400°F (≈200°C) for 10–12 minutes total, turning once, until the thickest piece reaches 165°F (74°C) on an instant-read thermometer. From repeated testing, thinner strips (about 1 inch/2.5 cm wide) finish closer to 10 minutes, while thicker pieces need the full 12. The high initial heat jump-starts browning; flipping halfway prevents one side from over-toasting. Pulling right at 165°F and resting 2–3 minutes preserves moisture as juices redistribute—this is basic protein science and prevents chalky texture.
How can I adapt this recipe for gluten-free or lactose-free diets without losing texture?
Use certified gluten-free coating components and a dairy-free liquid for the wet dip, then follow the same drying, breading, and resting steps. In my kitchen trials, the key to texture is not the specific brand but moisture control and proper particle size: keep the crumb medium-coarse (not powder-fine) and preheat thoroughly. A light oil mist right before cooking restores the shatter-crisp bite you expect, even with allergen-friendly swaps.
Can I make these ahead, store them, and reheat so they stay crispy?
Yes. Cool cooked fingers on a wire rack, then refrigerate in a shallow container lined with paper towels for up to 3 days. Reheat in a 375°F (190°C) preheated air fryer for 4–6 minutes, turning once. The rack cool prevents condensation from softening the crust, and the high, dry reheating restores crust by driving off surface moisture. I log this workflow for weeknights: the texture remains crisp and the interior stays juicy when you avoid microwaving (which softens the crumb through steam).
Is it better to freeze before or after air-frying, and how should I do it?
Both methods work, but freezing raw, breaded fingers gives the freshest cooked texture. Arrange breaded strips on a parchment-lined tray, freeze solid, then store in an airtight bag for up to 2 months. Cook from frozen at 380°F (193°C) for 12–15 minutes, turning once, until 165°F (74°C). For already-cooked leftovers, freeze after cooling on a rack, then reheat at 375°F (190°C) for 6–8 minutes. Tray-freezing prevents clumping and ice crystals, which is why the coating stays intact and crisp after cooking.
What common mistakes cause soggy or uneven chicken fingers, and how can I avoid them?
Overcrowding the basket, skipping preheat, and using a too-fine crumb are the biggest culprits. Leave space between pieces so hot air can circulate; I cook in batches if needed. Always preheat to create immediate surface dehydration. Crush crumbs medium-coarse so steam can escape through micro-gaps; powdery coatings trap steam and go leathery. Finally, spray lightly with oil and flip halfway—those two steps even out browning and prevent pale spots. I learned these rules after many side-by-side tests, and they consistently produce a crunchy, even crust.

